Are you in the Market for Greeting Cards?

How do you shop for greeting cards?  When I was in the market for our yearly supply of birthday cards, I wasn’t exactly sure where to start.  My predecessor would make trips to the local discount store to purchase greeting cards.  No offense to her as she was doing the best she could, but the cards were always so flimsy and looked cheap.  This was not how I thought our business should be represented.

The first thing I did was hit the internet.  I went to multiple sites and requested catalogs.  This was a great way to start.  Most companies not only sent me a catalog but a sample of their greeting cards and sometimes even their envelopes.  It was really helpful as I was able to compare the quality of greeting cards from each company.

Once I narrowed down my choice to The Gallery Collection, I hopped on their website to see their full line of greeting cards.  It was so difficult to select one from all the beautiful designs.  They were nice enough to send me samples of my 6 favorite.  I then passed them along to my colleagues in the Human Resources Department for a vote.  We have the perfect birthday cards that I am proud to send to our customers and staff.

What is the Purpose of a Greeting Card Assortment Box?

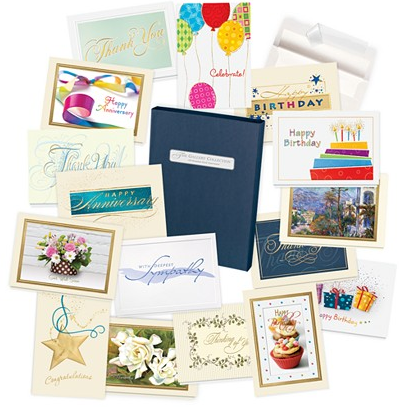
OMG I can’t tell you how many times having a greeting card assortment box has saved my life.  OK, that’s an exaggeration, but having it is amazing.

You know how tired you are at the end of the day and you just want to go home and flop down in a chair and chill?  Well, imagine that and then remembering that you have a birthday at work the next day and there is no way you can drag yourself out to the store.  Having a greeting card assortment box means all you have to do is probably open a drawer or closet in your own home and choose a card, without ever having to leave the house.  And an assortment box of cards doesn’t only come in handy at home; I have a box in my desk at work too.  That way, my office crew is prepared for any situation.

Not to mention, it’s an assortment box, so you have some of everything.  I know I’ve often times used the “Thinking of You” card when I’ve heard some news about a friend or former neighbor and you really just want to brighten their day.  It’s just a little something, but just enough to cheer someone up.

What a perfect solution to having everything you need at your fingertips – any time of the day or night.  A greeting card assortment box answers all your needs and can most likely get you through more than a year of events – planned and unplanned.

Creative Crafts with Business Christmas Cards

I hate to throw away all the beautiful personal and business Christmas cards I’ve received through the years. Yes, I keep all the cards I receive, and all the Christmas cards my family receives too! They are too pretty to throw away and they mark the years as my children are growing up. However, since I have so many of them, sometimes I like to get crafty with all the great cards and designs.

One of the great things you can do with your old personalized Christmas cards is to make garlands that you can hang all around the house and outside (in warm climates) as well when you decorate for the holidays. Begin with using as many horizontal cards as you have. You can use a simple ribbon about 6 to 8 feet long. If you need a longer size, make sure your ribbon is a big spool. You can also use a thin clothesline, string, or wire. Measure the size you need and cut it to size. Start overlapping the horizontal cards over the ribbon and staple them around the ribbon making a thin pocket for the ribbon or string to be enclosed in. To keep the cards in place at about 5 or six inches from each other, staple the card to the string or ribbon in the center top of the card. To make them even prettier, use a pair of pinking shears or craft scissors that are available with the crazy cuts on them to put a beautiful edge on the cards.

You can also glue some glitter onto the card in the art or on the edge of the card, or attach some little rhinestones or colorful buttons or small shiny items on the card to give it some sparkle. You will be surprised at what a difference that makes. If you have vertical Christmas cards to be used you can use a small hole punch to make a hole on the top of the card and run a ribbon or string through it and then hang the card with tying a bow on the banner ribbon or string.

You can also use Christmas cards to create cupcake toppers or decorations. Use any and all of your cards and cut around the art on the front of the cards. You will have to make the art somewhat small to fit nicely on the top of a cupcake. Once that is done, get some little sticks that they sell in the baking aisle of your craft store or food store and glue the art from your cards to the stick.  Once dry, you can stick the decoration right on the top of the cupcake and line them up on a platter and you have beautiful, colorful cupcakes perfect for holiday get-togethers.

Now you have two new ideas for you to try when you have all those beautiful cards that you do not want to throw away!

Craft Ideas for Recycling your Birthday Cards

I don’t consider myself to be a pack rat because I don’t like clutter, but recently I decided to clear out a couple of “junk drawers” and a closet. I finally got rid of the magazines and newspaper clippings with recipes, especially holiday or birthday recipes (that I never cooked) and craft ideas (that I never made). I also tied up the four years of National Geographic magazines that my kids never used for reference for school reports. Duh! When was the internet invented?

As I came across the next hurdle, I knew I wouldn’t part with it. It was my box of personalized birthday cards. I save greeting cards that I receive from friends and relatives. You know the ones with the beautiful wrapped presents on them and the ones with balloons and cakes and candles. I like to recycle things and also love crafting. If I like the design on the front of the card or the greeting on the inside, I just throw the card in a drawer, thinking one day I’ll do something with it. Well, with the drawers and closet overflowing, I had to act. Here are some ideas I came up with:

Idea #1 – Instead of buying expensive wrapping paper, collect all the birthday cards that you’ve received, especially the ones with beautifully wrapped presents on them. Wrap your gift either in brown or white craft paper (I’ve even used aluminum foil in a pinch) or a put it in a plain box or gift bag. You can cut the pictures and words off the cards and paste them randomly on the package. You can even use the inside greeting or verse words. If you have enough birthday cards you can cut out each letter individually to spell “Happy Birthday” or the recipient’s name. I like to use craft scissors with different edges to vary the finish. Your gift will be unique!

Idea #2 – Cut the pictures off the front of the birthday cards and make gift tags by punching a hole in the top of each image and pulling ribbon through it. Tie a bow and tape it to your gift.

Idea #3 – Use birthday cards for your scrapbooking projects. When filling a page with pictures from a birthday, cut the words, pictures, and greetings off the cards. Arrange them around the pictures to add descriptive memories of the special event. Finish the page by adding bows, ribbons, or fabric swatches to add texture. Although I never seem to get the time to do my own scrapbook, I have made pages for my niece to add to her book with pictures I have taken at her special events such as her Baptism, first day of school, and a Disney vacation.

Customized Crafts using Personalized Birthday Cards

What do you do with your personalized birthday cards after you open them? Okay, you might display them for a while, but when you get tired of looking at them, or tired of picking them up when the cat knocks them over (I assume this must happen, although I’ve never actually witnessed it), you probably dispose of them. If you’re environmentally conscious, you recycle them, and if you’re not, you throw them in the trash. If you’re the sentimental type, you might store them in a box that you only open on those rare occasions when you change your place of residence, or on the even rarer occasions when you clean out your attic. Now, I admit that I immediately recycle the ones with glitter (environmentally conscious, don’t like glitter), however the non-glittery ones face a more interesting fate. I take these used birthday cards and give them another chance to make someone smile, by using them to make customized craft items.

Today I am going to tell you how to make gift boxes. Gift boxes are simple to make, and can be used for small items like jewelry, or those gift cards that are so popular these days. And since gift cards aren’t the most creative gift you can give, at least the box can be creative, right? My favorite design for gift boxes is something called a pillow box. For this project you will need birthday cards, glue, scissors, a pencil, a ruler, a butter knife or other object that you can use to score (crease) the paper to make it easier to fold, and a circular object like a plate to trace the curved ends of the box.

Step 1: Fold the birthday card along its normal crease.

Step 1

Step 2: Flip the card over so you are looking at the back of the card.

Step 3: Measure and draw a straight line along the lower (open) edge of the back of the card, approximately 1 inch from the lower edge. The 1 inch measurement here is really just a suggestion. This portion is going to be cut away from the front of the birthday card, so you may want to adjust this to control the portion of the front of the card that will appear on the completed box.

Step 3

Step 4: Holding the ruler along this line, score it using the back (non-serrated) edge of the knife. You do not want to cut the paper; you only want to make a crease.

Step 5: Fold the card, along this new crease, away from you, and toward the front of the card.

Step 5

Step 6: With the birthday card in this position, you will see a small portion of the inside edge of the front of the card. Trace a line onto the inside of the front of the card, along the folded edge you just created. Cut this edge off the front of the card.

Step 6

Step 7: Turn card over and apply a small amount of glue to the inside edge (the side facing the inside of the front of the card, outlined in red below) of the flap you created in Step 5 and spread it evenly across the entire flap.

Step 7

Step 8: Press this glued edge onto the inside of the front of the card and apply pressure. You may want to place a heavy object like a book on the card to help glue the edges firmly together.

Step 9: While you’re waiting for the glue to dry, you can perform steps 1-6 on your next couple of cards – you didn’t think we were only making one of these, did you? When the glue has dried, place the round object (plate or bowl) on the folded and glued card, so that the curved edge of the object touches the left side of the card. Trace the curve with the pencil. Repeat for the right side.

Step 9

Step 10: Cut along these lines so the birthday card is now curved on the sides, and straight on the top and bottom.

Step 10

Remember to recycle the scraps.

Step 11: Place the round object back on the card and score the curve (using the back of the knife) in the opposite direction from the curved edge to form a shape that looks like parentheses ( ). You will need to do this on both the left and right sides, on both the front and back of the card.

Step 11

Step 12: Here’s the fun part. Turn the card so that the back edge is facing you. Press the curved shape – the one that looks like parentheses ( ) – on the left side toward the front. Repeat on the right side. Flip the card over and do the same thing on the front of the card on both sides. The box should “puff” and the curved folds should hold it in place.

Step 12

You can adjust the height of the box by removing more or less than one inch from the bottom of the card. You can also adjust the portion of the card that is visible by using a fold other than the natural fold of the card. Since these are so easy to make, feel free to experiment and remember to properly recycle the scraps!

Being Creative with Personalized Christmas Cards

There is nothing like receiving personalized Christmas cards around the holiday season. Stunning images of peace, happiness, and the good-old Christmas tree all talking to me and saying, “It’s about time to receive some presents.” Maybe they tell you, “Time to buy some gifts for others,” but to each his own.

Now it’s time to hang them all over my apartment, up and down the doorway to the front hall…covering every inch I can spare much like the walls covered in a Houlihan’s or TGIFriday’s with various trinkets. Only my trinkets are in the form of greeting cards, expressions of holiday greetings on display for the whole world to see…or whoever shows up at my place.

Now the Christmas season is over. No more presents to open. No more eggnog to drink. Oh look, here’s my trophy wall of personalized Christmas cards. Now seems to me this is just a waste, throwing them out with no thought of what else can be done with them. So I’m thinking to myself over and over, “What do I do with these greeting cards?”

I sip my coffee and then there it is, a spectacular idea literally staring me in the face. Take your empty coffee can, wash it out, dry it, and let the fun begin. Pick up a spray paint can of whatever color you think will look good as a base and paint the can. Then go over to your Christmas cards and pull them off the wall carefully; I know that’s hard because we always pull them off so quick and to the point.

Now cut out those beautiful images of Christmas trees and snowmen and swirly holiday greetings and glue them to the outside of the spray painted can. After collaging the images to the outside of the can, cover the can with a clear glue or a clear-drying finish to protect your masterpiece. Let it dry, and there you have it – a candy dish for next year. And you actually did something creative with your time while finding a way to reuse all of those old holiday cards.

Birthday Cards, Jars, and Teddy Bears

I had never considered myself a creative, crafty person. But years ago, I was planning a party for my daughter’s 2nd birthday. I wanted to have party decorations and favors. With entertainment funds low, I went through my collection of “rainy day stuck in the house when we’re really bored this stuff will have a use” box. In there I found material scraps not big enough to make anything with…feather boas, lace, ribbons, and about 12 small stuffed teddy bears that I bought for ten cents each at a clearance sale, plus many jars of various shapes and sizes. That box also contained numerous personalized greeting cards that I had saved because the pictures were so pretty.

The box held birthday cards, thank you cards, holiday cards, and a few note cards that a charity had sent me in the mail. (Yes, I did send a donation!) I set everything out on the kitchen table and thought, “There has to be a party here somewhere!” I left out all of the pieces for a while, wondering what I would do. I’d look and walk away, look and walk away…hoping to have an epiphany. This went on for a couple of hours and finally the light bulb went off!

Girls love teddy bears, boas, ribbons and lace. I took a bear and gingerly pulled off its head, arms, and legs (It was more painful for me than him, I assure you). I took out my hot glue gun and attached the head to the lid of a jar. Then I placed the arms on the sides of the jar. And lastly, I glued the legs to the sides near the bottom of the jar. I shaped pieces of material into a party hat trimmed with ribbon and lace and wrapped a boa around the bear’s neck. My creation was really starting to look great!

Next, I took some of the birthday cards and thank you cards and cut out the words “thank you” and “happy birthday.” I glued the text to toothpicks and placed the signs in the bear’s hands.

I filled the jars with wrapped candies, and each girl who came to the party left with a teddy bear jar. These made the most memorable party favors. After the party, I got so many compliments on the favors that I started making clown jars and giving them as gifts.

I no longer need a “rainy day box” but I do still save my greeting cards in another crafty creation. Using a cardboard shoe box, I cut and pasted the fronts of birthday cards and thank you cards onto the box. The greeting cards turned a plain old box into a beautiful storage container. I even store my photos in these homemade greeting cards boxes, too.

Anyone need a jar?

Crafting Greeting Cards into Placemats

What can you do with old greeting cards? I bet you are thinking: “make Christmas ornaments!” That’s fine for Christmas cards but what about those all purpose cards and birthday cards received throughout the year? And what can you do with that pile of your children’s birthday cards that are collecting dust in your drawer? It would be such a shame to throw away greeting cards after receiving and reading them, so let their beautiful designs and colors inspire you to use them in creative ways.

One thing that you can do with your children is collect all the birthday cards they receive and make placemats. This would make a great gift for any family member and this activity will spark your children’s creativity, making them use their noggins. It is also a great geometry lesson!

You will need old birthday cards (or really any kind of all purpose cards), scissors (child-safe please!), construction paper, glue, and either a laminator plus laminating paper or clear contact paper.

First, help your children cut out different shapes from the greeting cards. Then have them lay out the shapes on the construction paper so they can measure their picture before gluing (I warned you this would use math!). Once they have decided on the picture they want, glue the different shapes onto the construction paper. If there is room, they can write a message to the person to whom they are giving the placemat or they can just embellish their picture. Finally, either run the placemat through a laminating machine (most office supply stores will laminate for you), or use clear contact paper to cover the placemat so it can be wiped clean.

And there you have it….a great gift for anyone in your child’s life, created by reusing personal birthday cards and all purpose cards! Come to think of it, using old Christmas cards would also make your holiday table look great too!

Creative Projects Using Birthday Cards and All Occasion Greeting Cards

Well hello there! For all of you environmentally conscious people out there, here are some great ideas on what to do with all the beautiful birthday cards and all occasion greeting cards you and your family receive all year long. Yes, I know they are all too pretty to throw away, or you love the sayings on the insides, or the ones the kids got you are too cute to throw out, but what do you do with all of them?

Well here’s the first of many ideas. You must have a large wide candle in the house, don’t you? If not, then purchase an inexpensive one in any desired color. Get white glue or a decoupage glue/finish such as Mod Podge and an X-Acto knife or a sharp little scissor. Find the prettiest part of the birthday card or the words “happy birthday” or some flowers on the card (whatever the art is on the card) and cut it out very carefully keeping close to the outline of the art. Put some glue on the back of the art and glue it carefully to the candle. You can put the art randomly around the candle or the words happy birthday straight up and down or around the base. If you are using Mod Podge, after the first coat that you used to glue the art to the candle is dry, you can give it another coat to seal it. If you want to, you can use some glitter or some beads or sparkling jewels for added embellishments. And there you have it…a keepsake candle to bring out for every family birthday!

Ah…and how about a handmade beautiful birthday or anniversary decoupage cake plate? What a great item to keep or to make for a gift! Purchase a clear glass plate large enough for a cake. A platter would work as well. For this project you will need to use the Mod Podge glue because it works well for decoupaging. You can purchase it at your local craft store, such as Michaels or A.C. Moore. Find the beautiful parts of the art on your greeting cards and again, carefully cut them out. Turn the clear glass dish or platter over and glue the front of the art to the underside of the plate so that when you look at the top of the plate you see all the beautiful cut outs. You may place the art randomly around the plate or completely cover every inch for an overall effect.

If you only want to use a few pieces of art on the plate, a good idea is to purchase colored tissue paper or a beautiful patterned tissue paper and cut a piece out the size of the plate or platter. After you have glued down all the art you want to use and if there is still clear glass showing, cover the complete bottom of the plate with a piece of the tissue paper. Glue down the tissue and then cover the entire bottom of the plate with Mod Podge for a sealed finish. I would give it two coats of the Mod Podge, letting it dry in between coats. If you do not want to use the tissue paper, you may also use paint to finish off the clear spaces. A metallic gold or silver looks beautiful as a finish. Just make sure the art is coated with a sealed coat of the Mod Podge before you apply any paint. And also make sure that the paint is non-toxic and can be used on surfaces to serve food. After the paint is dry apply another coat of Mod Podge for a sealed finish, which will water-proof the surface as well.

Another great use for your birthday cards, anniversary cards, get well cards, or holiday cards is to make handmade gift wrap. To start, purchase a solid color or a striped pattern wrapping paper. Or you could use plain brown wrapping paper, which works beautifully! For a small package, you could even use a plain brown bag that you get from the food store. I would wrap the package first before adding any art. Then carefully add the cut outs from your greeting cards and glue them on to the wrapped gift, either in a pattern or randomly scatter them all over the package. You can also use one of the cut outs as the greeting card enclosure. And there you have it…your own customized gift wrap.

One last quick idea for your greeting cards…a beautiful garland. Again carefully cut around the art on your cards. Using a hole punch, place a hole on the cut outs large enough for a narrow satin or wired ribbon to fit through, and thread the ribbon through the holes spacing the cut outs a few inches from each other to make a ribbon garland. If the ribbon is wide enough, your art will stay in place a few inches from each other. Otherwise, put a small knot on either side of the cut outs to manually hold them still. Depending on how many pieces of art you want to use, cut the ribbon long enough to suit your needs. You can place your garland around the house for a birthday or a holiday appropriate for the cut outs you used.

I hope these ideas are helpful for you to start creating beautiful works of art with all of your greeting cards. Start creating and have fun!